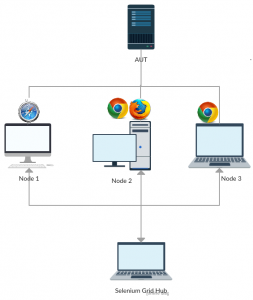
Selenium Grid is used for running Selenium test cases in parallel across many browsers and platforms and this help us to execute test suite(s) faster and reduce the test execution time. It helps to reduce the test execution time further and add more value to test automation. Selenium Grid has two versions.
We will discuss about the latest version, Grid 2.
In this blog post we will discuss running Selenium test cases across multiple browsers. We will start with the prerequisites required, downloading the grid, starting hub and node. Configuring Selenium Web Driver tests and TestNG are discussed in following section. Advanced usage of Selenium and troubleshooting are discussed at the end of the blog post.

Selenium grid hub
Pre-requisites
We assume following JDK 1.7 or later it is installed.
All required web browsers are installed on target machines (remote and local) Selenium Web Driver + Java + TestNG test cases are available.Testng.xml file is configured to run the test suite successfully Understand use of external drivers to run tests against IE, Google Chrome etc and have the external drivers.
Downloading Selenium Grid
Selenium Grid and selenium remote control server are bundled together in Grid 2.
Download the latest version of selenium server ( .jar file)
http://selenium-release.storage.googleapis.com/index.html

selenium jar file
Save the .jar file into your project folder. We use this folder as {GRID_HOME}
Ensure the version number match with the Web Driver version used in pom.xml
Starting Hub
- Open a command prompt
- Navigate to the {GRID_HOME}
- Type following in the command prompt and hit enter key to start the hub.
java -jar selenium-server-standalone-2.53.1.jar -role hub
Change the version number to match your selenium server version
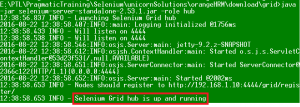
4.Wait till hub is started. Following will appear in the console when the hub is started successfully

Verify Hub
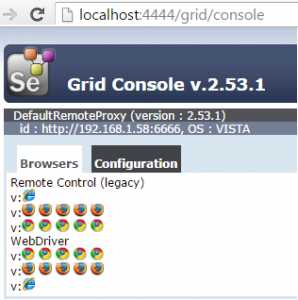
Open a web browser and navigate to http://localhost:4444/grid/console to view the status of the hub.

view config
Starting Nodes
Now you can start the nodes.
- Open a command prompt
- Navigate to {GRID_HOME}
- Type following into the command prompt and hit enter key
java -jar selenium-server-standalone-2.53.1.jar -role node -hub http://localhost:444/grid/register
local host should be changed with IP address if your hub is running on a remote machine.
Default port number associated with node is 5555. If you wish to run multiple nodes on a same machine you will have to run nodes on a unique port. Use -port XYXM parameter to set the port.
Example :
java -jar selenium-server-standalone-2.53.1.jar -role node -hub http://localhost:4444/grid/register -port 6666
4. Wait till node is started and registered with the hub. Following will appear in your console.
Selenium server version of the hub and node should be same

Shutdown Node and Hub
Focus to the console of Node or Hub. Press Ctrl +Enter to shutdown hub/node.
Do not close the console(s) to shutdown the service.
Verify node registration with hub
Open a web browser and navigate to http://localhost:4444/grid/console to view the status of the hub. You will see the newly registered node(s) with the hub listed in the web console.

By default a node will allow for concurrent use of 11 browsers for WebDriver. Five Firefox, Five Google Chrome and One IE.
Please refer to Advanced section to configure the nodes by command line.
Configuring Selenium Tests
- Configuring Selenium WebDriver
You will have to use RemoteWebDriver instead of FirefoxDriver, InternetExplorerDriver, ChromeDriver etc. The DesiredCapabilities object will be used to set the desired browser name, browser version , platform etc. Basically, the DesiredCapabilities help to set properties for the WebDriver.
- Create target browser capabilities
DesiredCapabilities capability = DesiredCapabilities.firefox();
2. Pass the DesiredCapabilities object into the RemoteWebDriver
WebDriver driver = new RemoteWebDriver(new URL(“http://localhost:4444/wd/hub”), capability);
localhost should be changed with IP address if your hub is running on a remote machine
Hub will select the nodes based on the requested capabilities. We will have to set the capabilities to match desired browser type, browser version, platform etc.
Example :
- capability.setBrowserName(“firefox” );
- capability.setPlatform(“WINDOWS”);
- capability.setVersion(“3.6”);
The name of the browser should be one of {android|chrome|firefox|htmlunit|internet explorer|iPhone|iPad|opera|safari}.
Platform the browser should be one of {WINDOWS|XP|VISTA|MAC|LINUX|UNIX|ANDROID}
- Configuring TestNG
- Open your Selenium Project in IDEA.
- Open testng.xml file which was configured to run the test suite.
- Add following parameters to run the tests, classes etc in parallel.

Select parameter option tests to run the tests in parallel. Select classes to run test classes in parallel. You may choose classes if you wish. Set it to false when you don’t want to run the tests in parallel.
Running the Test Cases
You can execute the test suite by running the testng.xml file. Test cases will be executed in parallel in multiple browsers.
Advanced
You can try following options when you are comfortable with basic usage of Selenium Grid.
Start a node for Internet Explorer
java -jar selenium-server-standalone-2.53.1.jar -role node -hub http://localhost:4444/grid/register -port 6666 -Dwebdriver.ie.driver=”FULLPATH_TO_IE_DRIVER”
Start a node for Google Chrome
java -jar selenium-server-standalone-2.53.1.jar -role node -hub http://localhost:4444/grid/register -port 6666 -Dwebdriver.chrome.driver=”FULLPATH_TO_CHROME_DRIVER”
Configuring nodes by command line
Use -browser parameter to set the browsers explicitly when nodes are started.
-browser browserName=firefox,version=47,maxInstances=3,platform=WINDOWS
Configure multiple versions of Firefox on same machine
Add two -browser parameters with browsers’ information.
-browser “browserName=firefox,version=42,firefox_binary=c:\Program Files\firefox42 ,maxInstances=5,platform=WINDOWS”
-browser “browserName=firefox,version=44,firefox_binary=c:\Program Files\firefox44 ,maxInstances=3, platform=WINDOWS”
Ensure parameters are enclosed with quotation marks when spaces are in the values.
Configure Hub using JSON
Hub can be started with a custom configuration give in a JSON file.
java -jar selenium-server-standalone.jar -role node -hubConfig hubconfig.json
Sample JSON file
{
“host”: null,
“port”: 4444,
“newSessionWaitTimeout”: -1,
“servlets” : [],
“prioritizer”: null,
“capabilityMatcher”: “org.openqa.grid.internal.utils.DefaultCapabilityMatcher”,
“throwOnCapabilityNotPresent”: true,
“nodePolling”: 5000,
“cleanUpCycle”: 5000,
“timeout”: 300000,
“maxSession”: 5
}
Configure Node using JSON
Similarly you can configure nodes using a JASON file.
java -jar selenium-server-standalone.jar -role hub -nodeConfig nodeconfig.json
Sample JSON file
{
“capabilities”:
[
{ “browserName”: “chrome”, “maxInstances”: 2 },
{ “browserName”: “firefox”, “maxInstances”: 2 },
{ “browserName”: “internet explorer”, “maxInstances”: 1 }
],
“configuration”:
{
“nodeTimeout”:120, “port”:5555,
“hubPort”:4444, “hubHost”:”localhost”,
“nodePolling”:2000, “registerCycle”:10000,
“Register”:true, “cleanUpCycle”:2000,
“Timeout”:30000, “maxSession”:5,
}
}
References
Selenium [Online], Available from<http://www.guru99.com/introduction-to-selenium-grid.html> [Accessed 09/09/2016]
Selenium [Online], Available from<http://testng.org/doc/documentation-main.html#parallel-tests> [Accessed 09/09/2016]
Selenium [Online], Available from<http://www.seleniumhq.org/docs/07_selenium_grid.jsp>[Accessed 09/09/2016]
Selenium [Online], Available from<https://github.com/SeleniumHQ/selenium/wiki/DesiredCapabilities>[Accessed 09/09/2016]
Selenium [Online], Available from<http://stackoverflow.com/questions/17527951/what-is-the-use-of-desiredcapabilities-in-selenium-webdriver>[Accessed 09/09/2016]
Selenium [Online], Available from<http://stackoverflow.com/questions/9662241/selenium-is-not-able-to-launch-the-ie>[Accessed 09/09/2016]
Selenium [Online], Available from<http://www.softwaretestinghelp.com/selenium-grid-selenium-tutorial-29/>[Accessed 09/09/2016]
Selenium [Online], Available from<https://www.youtube.com/watch?v=S4OkrnFb-YY>[Accessed 09/09/2016]

Comments