HTTPS Recording with
Introduction
HTTP Test Script Recorder (JMeter proxy) is capable of intercepting HTTP and HTTPS traffic and recording them into a JMeter test plan (JMX). The technique can be used for recording local/remote web browser actions, mobile (android, iOS etc) traffic.
JMeter needs to use a certificate to authenticate the connection between the client (browser, device, application) and the server. JMeter generates its own certificate with a validity period of seven days. Generally this certificate is not trusted by the browsers. Hence the certificate needs to be installed on the browser/device as a trusted certificate.
Browser/Client checks
- Server presented certificate is signed by a Certification Authority (CA)
- Check if the certificate is linked to one of it’s installed root certificates
- Certificate is not expired
- Certificate is for correct domain/host and it’s valid
Above conditions should be satisfied during the HTTPS traffic recording.
We will start with extending JMeter root certificate’s validation period and move into installing the certificate, configuring proxy on browser/devices and recording HTTPS traffic. We will cover web browsers, Android and iOS mobile devices in this post.
Let’s get started
We need to have an active certificate throughout the test script recording. Usually the test script creation takes more than seven days.
Default validity period of the JMeter temporary certificate is 7 days. You will have to recreate the certificate after every seven days. Following will help you to extend the validity period of your temporary certificate.
1. Extend the validity period of the Temporary Certificate
Delete following files from MTER_HOME/bin folder if they exists

Note : Above files will get created when you first start the JMeter HTTPS Test Script Recorder (JMeter proxy)
Open user.properties file in a text editor
Add following to the end of the file to extend the expiry period to 356 days and Save the file.
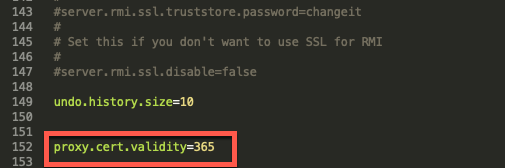
Note : It is a good practice to add/update the properties in the
JMETER_HOME/bin/user.properties file instead of JMETER_HOME/bin/jmeter.properties.
Configure HTTP(S) Test Script Recorder Controller
Start with a new Recording template and select the HTTPS Test Script Recorder controller.
- Set proxy server port (default value, 8888 should be fine)
- Set the HTTPS Domains
- Set the Target Controller

Configure the Request Filtering (if required)

Start Proxy Server
Click on the start button in HTTP(S) Test Script Recorder controller.

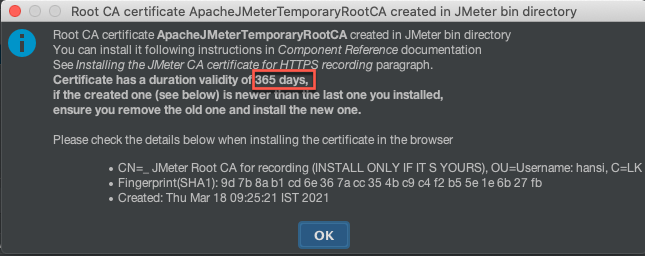
New certificates with the new validately period (365 days) will be created when you start the HTTP(S) Test Script Recorder (proxy server).
Setting Browser Proxy
Launch Firefox
- Type about:preferences in the address bar
- Type proxy in the search box
- Click Settings button in the Network Settings area

- Select Manual proxy configuration radio
- Set HTTP Proxy to localhost (or IP of the JMeter proxy server)
- Set the port to 8888 (this should match with the port in HTTP(s) Test Script Recorder)
- Check User this proxy server for all protocols
- Click OK button to complete the configuration

Installing the Certificate on Firefox
- Open Firefox
- Type about:preferences in the address bar
- Typer certificates in search box
- Click on View Certificate button
- Select Authorities tab
- Click on Import button
- Select the certificate from your JMETER_HOME/bin folder
- Check the first option in the popup (Trust CA to identify the websites)
- Click OK

Note : You may have to delete existing JMeter certificates if you have already installed a JMeter certificate
- Select the JMeter Certificate
- Click Delete or Distrust button to delete the certificate


Now everything is ready and you can proceed to record the test scenarios. All the HTTPS traffic will get recorded to the target controller in the JMeter.
Same process can be used for the mobile devices and recording from other tools such as Postman. First you have to configure the device/tool proxy to the JMeter proxy. Secondly you have to install a valid JMeter certificate onto the device/tool. In the following sections you will learn them.
Install the certificate on mobile devices
- Send the certificate to yourself by email (Gmail) from the desktop computer as an attachment
- Open a web browser and access the email through web client
- Click the certificate in the attachment and follow the instructions to install it. You will have to accept the security warning.
Configuring Proxy on iOS
Please ensure your device and the JMeter are on the same network.
- Click on Settings
- Select Wifi
- Select the network
- Scroll down to configure the proxy
- Select manual in the configuration
- Server should be the IP address of your JMeter machine
- Port should be JMeter proxy port ( default is 8888)
Configuring Proxy on Android
- Click on Settings
- Select Network and Internet
- Select the connected Wifi ( your mobile and Jmeter should be connected to a same network)
- Click the setting icon
- Click edit icon to open the advanced settings
- Open Advanced Settings
- Select proxy to manual
- Set the Proxy hostname to JMeter IP address
- Set Proxy port to Jmeter proxy port
- Click Save to save the settings
Author: Janesh Kodikara
Performance Tester | JMeter Trainer | Software Testing Service Provider
Comments